


Imagine a situation where you try to connect to the internet but are unable to. You check multiple websites across different browsers but nothing works. However, the internet icon shows that you are connected to the internet.
To resolve the problem, or at least understand it, you run the Network Adapter troubleshooter as follows:
Click on the Start button and then go to Settings >> Updates & Security >> Troubleshoot.
Click on the Network Adapter troubleshooter from the list and run it.
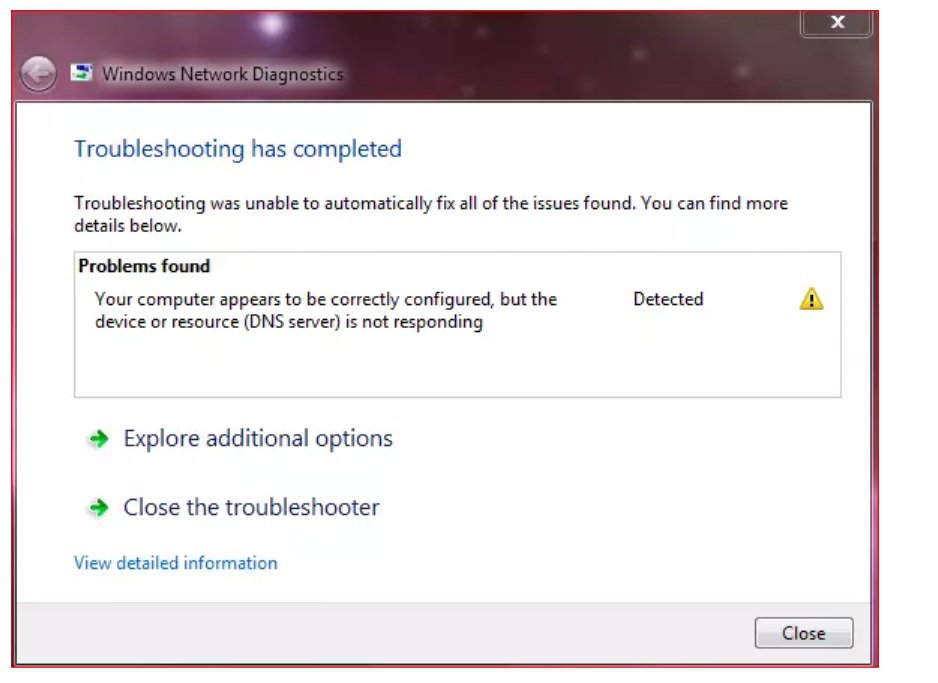
If the troubleshooter doesn’t fix your problem and returns the DNS server not responding then follow this troubleshooting guide.


The DNS server translates a website’s address into an IP address. Thus, if the DNS server is not responding, you will not be able to access websites, even though the internet shows connected.
Try the following solutions as recommended by The Windows Club to resolve the problem:
1] Check the router and power-cycle the system
Before proceeding to any solution with your computer, please update the firmware of your router and power-cycle the modem, router, and computer.
To power-cycle the modem, router, and computer, switch OFF all three units. Now switch ON the modem and wait until all the lights on the modem are stable. Then switch ON the router and make sure that all the lights are stable. Now, power ON the computer and make sure that the internet shows connected.
Check if this helps, else move to further solutions.
2] Enter the DNS server address manually
If the system is unable to resolve the DNS address, you could enter a universal DNS address manually. The procedure to enter a manual DNS server address is as follows:
Press Win+R to open the Run window and type the command ‘control panel.’ Hit Enter to open the Control Panel window.
Go to Network and Internet >> Network and Sharing Center.
On the left-pane, click on Change adapter settings.
Right-click on your network and select Properties.
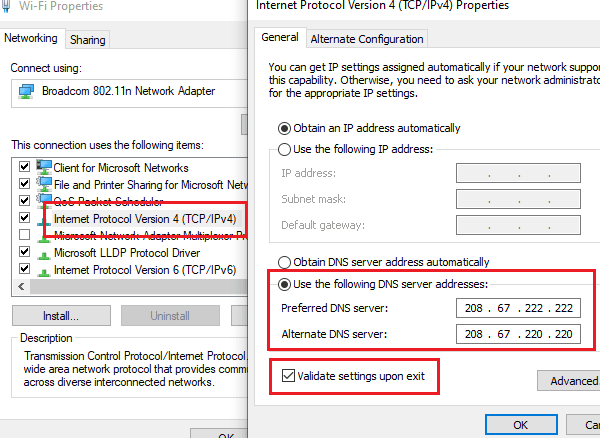
In the Network properties window, double-click on Internet Protocol Version 4.
In the Internet Protocol Version 4 properties window, shift the radio button to Use the following DNS server addresses. Enter the following values in the respective fields:
Preferred DNS server: 208.67.222.222
Alternate DNS server: 208.67.220.220
Check the box for Validate settings upon exit and click on OK.

3] Disable the Firewall
At times, the Windows Defender Firewall can prevent the network connection, thus causing the DNS server not responding error. To isolate this case, you can consider disabling the Windows Defender Firewall temporarily.
4] Update your Network Adapter driver
If the Network Adapter driver is obsolete, issues related to the internet connection would be frequent. The DNS server not responding could also be caused by an obsolete network adapter. You can update the Network Adapter to its latest version as follows:
Press Win+R to open the Run window and type the command devmgmt.msc. Hit Enter to open the Device Manager window.
Expand the list of Network Adapters.
Right-click on the Broadcomm Network Adapter and select Update driver.
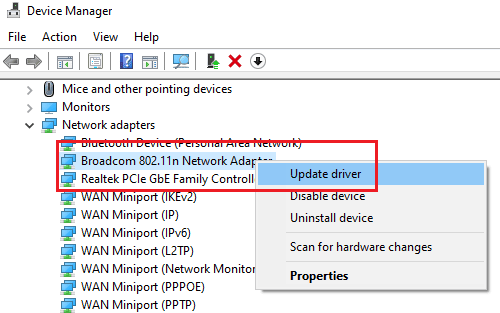

Choose the option to automatically update the driver.
Once the driver has updated, restart the system.
5] Clear the DNS cache and reset the IP address
The procedure to clear the DNS cache and reset the IP address is as follows:
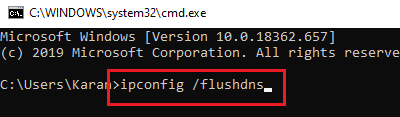
Search for Command Prompt in the Windows search bar and select Run as administrator for the option.
Type the following command one by one and hit Enter after each command:
ipconfig /flushdns
ipconfig /registerdns
ipconfig /release
ipconfig /renew

Restart the system after executing these commands.
Hope this troubleshooting helps in resolving the DNS server not responding error for you.