


Are you facing an I/O device error? Wondering what it means and how to fix it effortlessly? In this article, we will explore the causes and solutions for I/O errors, including the common error message “the request could not be performed I/O error” and error code “0X8007045D”. Whether you’re experiencing I/O device errors or want to understand what they are, read on to find out more.

What is an I/O Device Error?
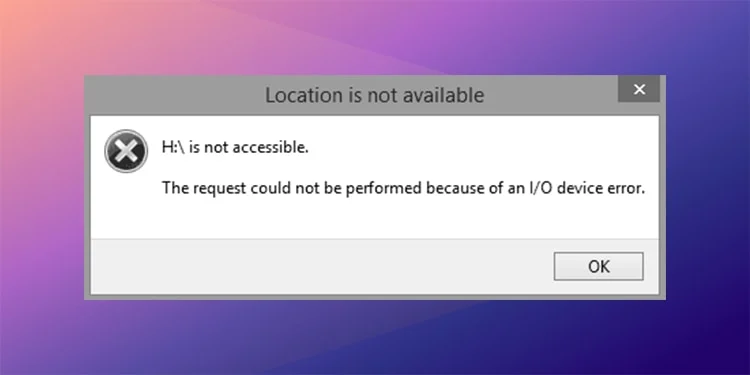
Many users often ask the question “What is an I/O device error?” on online Q&A forums or social media. Simply put, an I/O device error refers to a problem with the input/output (I/O) operations of a hardware device. This error is often accompanied by the error code 0x8007045d or the error message: “The request could not be performed I/O error.”
I/O errors can affect various hardware devices, including disk drives, USB drives, CD/DVD drives, and network adapters. Such errors disrupt communication between the computer and the device, resulting in data transfer or access issues.
How to Fix I/O Device Error?
If you encounter the error message such as “The request could not be performed I/O error” or ” Only part of a readprocessmemory or writeprocessmemory request was completed” , you don’t have to worry. There are 9 methods to troubleshoot I/O Device Error for you.
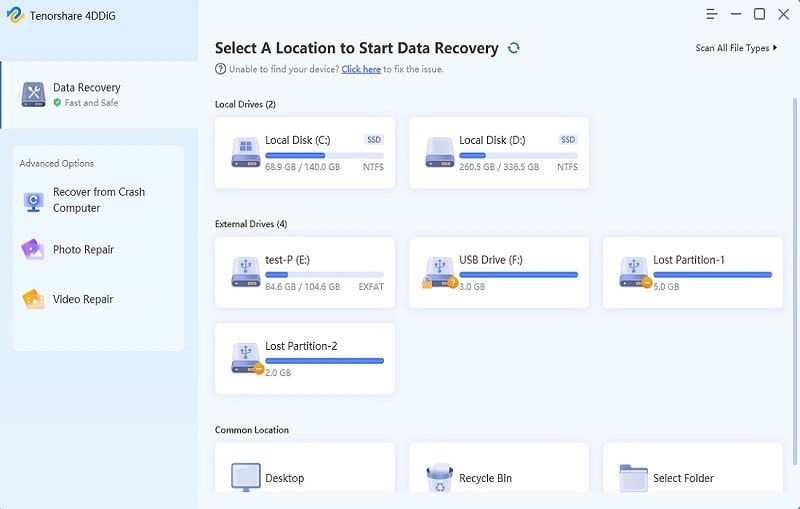
Option 1: Recover Data from the Drive with I/O Device Error
When encountering an I/O device error on your hard drive, there is a risk of damage or corruption to your external hard drive. As a result, your system fails to read the external hard drive, putting your important data at risk of loss.
However, you can still retrieve your data from the faulty hard drive by using the reliable Tenorshare 4DDiG Data Recovery Software. This powerful tool specializes in recovering data from inaccessible drives and supports various file types, including photos, videos, audio, and documents. Follow these simple steps to recover your data using 4DDiG:
Step 1: Select the External Hard Drive
Begin by downloading and installing Tenorshare 4DDiG Windows Data Recovery. Launch the program and connect your external hard drive to your PC. Choose the external hard drive and click on “Scan” to initiate the scanning process. You can also specify the file types you want to recover from the upper-right corner before scanning.

Step 2: Scan the External Hard Drive
Once you click on “Scan,” 4DDiG promptly scans your selected hard drive to locate the lost data. You can monitor the progress and pause or stop the scanning whenever necessary.

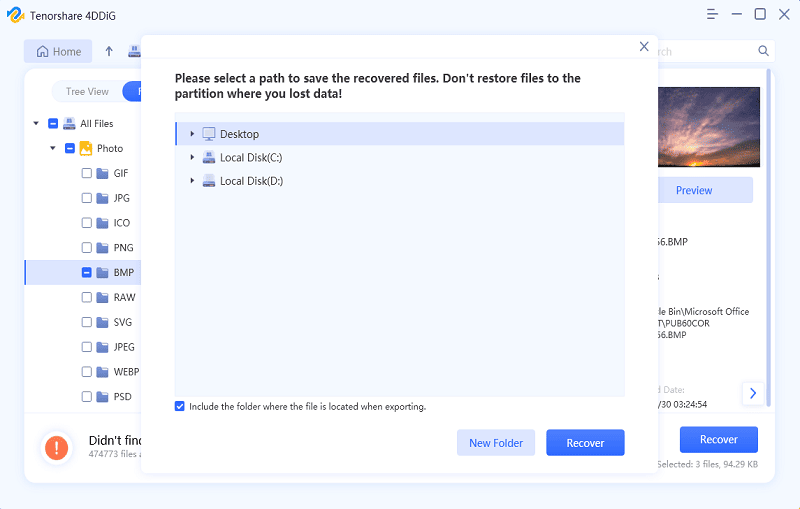
Step 3: Recover from the External Hard Drive
4DDiG allows you to preview and recover various file types such as photos, videos, audio, documents, and more. Select the desired files you wish to recover.
After clicking on “Recover,” a dialogue box will appear, prompting you to choose a location to save the recovered files. Select a suitable and unique location, then click “OK.”
If you want to know more about how to recover data from external hard drive, please read this comprehensive guide.
Option 2: Check Cable Connections to Fix I/O Device Error
A significant number of I/O errors occur due to issues with the cables connecting the external hard drive to the computer. Therefore, the first step you should take is to check the connections between your system and the external hard drive. Make sure that every cable is securely connected at both ends. If this simple solution resolves the I/O device error with your external hard drive, you will no longer encounter error messages such as “The request could not be performed I/O error” or error code “0x8007045d”.
Option 3: Change Connections Port
If the cable is not the cause of the I/O device error, attempt to connect the drive to an alternate port. You can try using a different port on your motherboard or utilize the USB connector for connection. Additionally, ensure that the connectors on your motherboard and USB ports are clean. If they are covered in dust or dirt, it is advisable to clean them thoroughly, taking care not to damage the pins. Afterward, try connecting the drive again.
Option 4: Check Cords to Solve I/O Device Error
Another commonly used approach to resolve the I/O device error is addressing cord crosstalk. Sometimes, when the power from one set of wires interferes with another, it can lead to disruptions during input-output operations. To tackle this issue, start by disconnecting all additional devices from your PC, leaving only the external hard drive connected. Ensure that the necessary cables are securely attached to the device.
Option 5: Update Your Outdated Driver
Outdated device drivers can potentially cause various issues on your device, including errors like “there is no media in the specified device” and “the request could not be performed because of an I/O device error.” To address this issue, follow the steps below:
Step 1: Connect the device with the I/O device error to your computer. Then, right-click on “This PC” and choose “Manage.”
Step 2: Click on “Device Manager” and select the category labeled “Disk drives.”
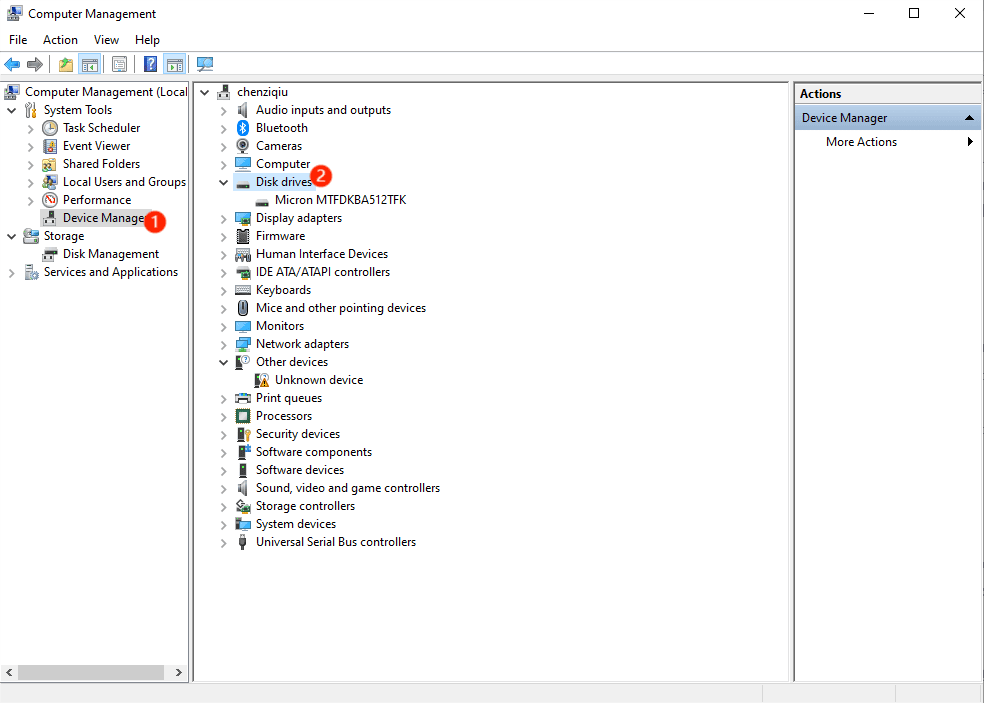

Step 3: Right-click on the problematic device and choose “Update driver.”
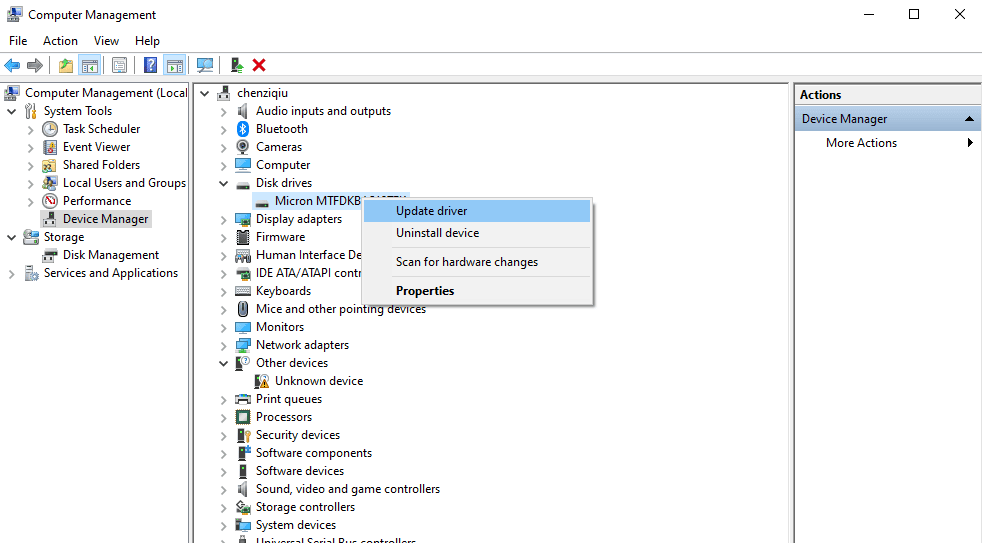

Step 4: Click on “Search automatically for updated driver software online.”
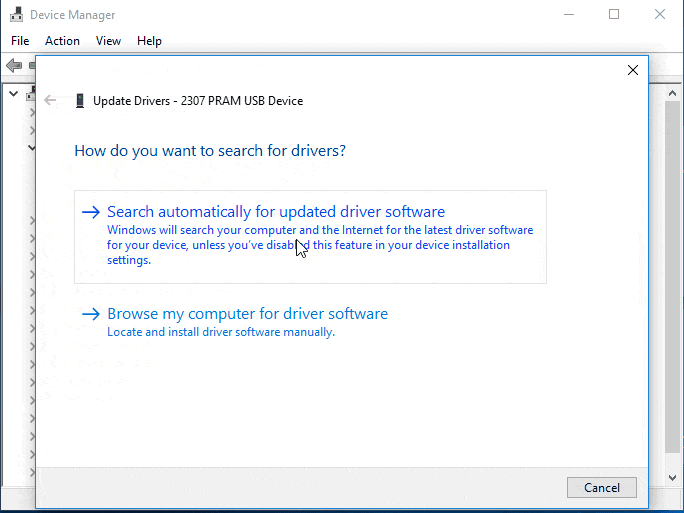

Wait for the driver update process to complete, then restart your computer. After the reboot, check if the I/O errors still persists by accessing your device.
Option 6: Alter the Drive’s Transfer Mode
If the transfer mode of your external drive is incorrect or has been changed, Windows will be unable to transfer data between the PC and the drive. Resolving the I/O device error involves correcting the transfer mode of the drive. Follow the steps below :
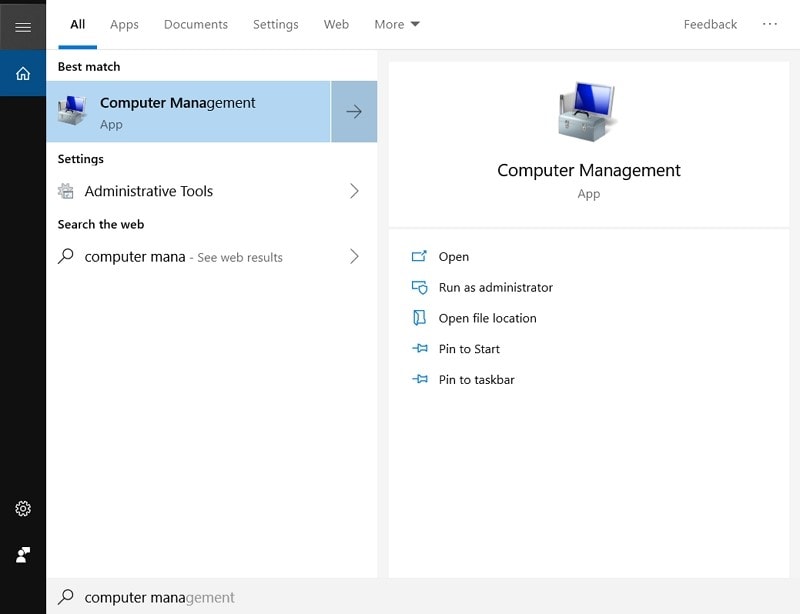
Step 1: Press “Win+S” and search for “Computer Management” .

Step 2: Click on “Device Manager” in the left panel. Expand the “IDE ATA/ATAPI controllers” option, and you will see a list of various IDE ATA/ATAPI channels for your PC.
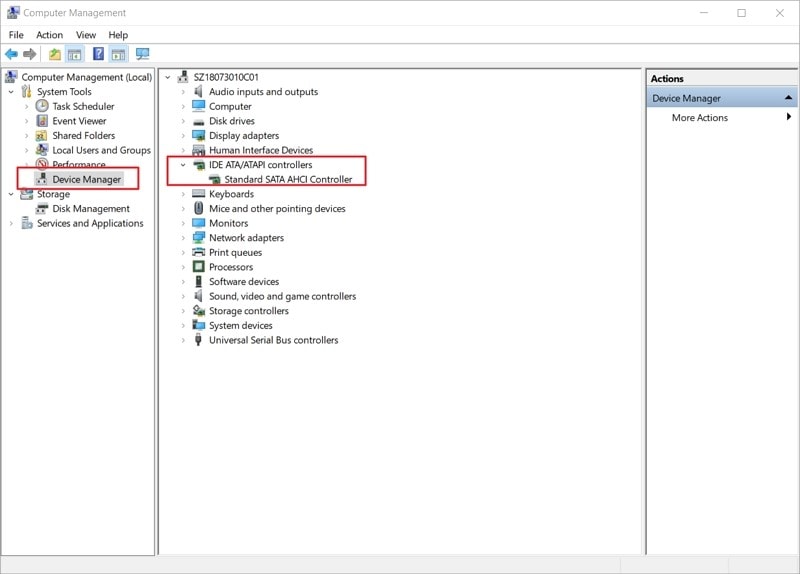

Step 3: Right-click on the channel to which the external drive is connected and select “Properties”. Typically, the Secondary IDE Channel is used for external hard drives.
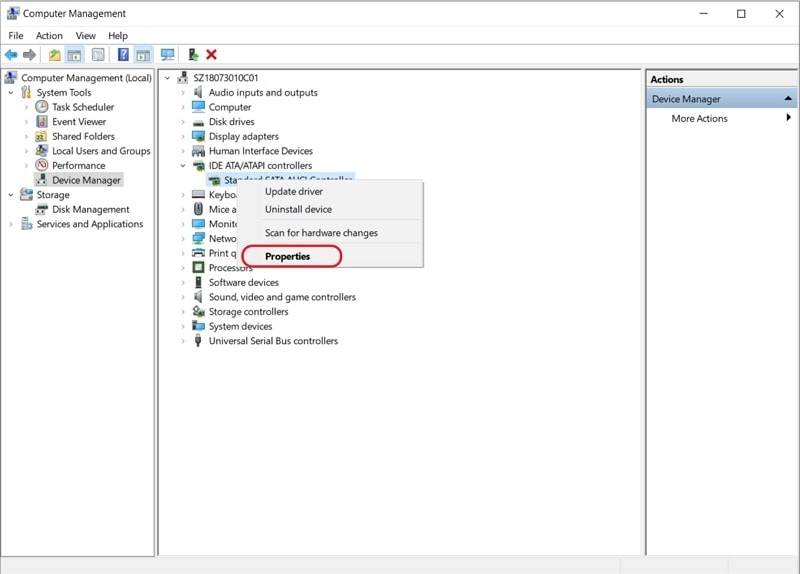
Warning: Please refrain from altering the transfer mode of the Primary IDE Channel, Device 0. Modifying the transfer mode of Device 0 can potentially lead to operational errors in your computer.
Step 4: On the “Advanced Settings” tab, deselect the option “Enable MDA” in the “Transfer Mode” box for the device corresponding to the relevant drive.
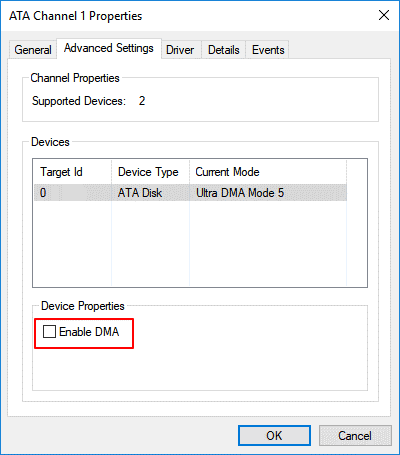

Close all windows and proceed to check the external hard drive for I/O errors by clicking “OK”.
Option 7: Use Command Prompt to Fix I/O Device Error
While I/O device errors are typically caused by hardware issues, there is a system tool available to attempt fixing the problem. The CHKDSK tool is designed to verify file systems and resolve file system errors. Here are the steps to utilize this tool:
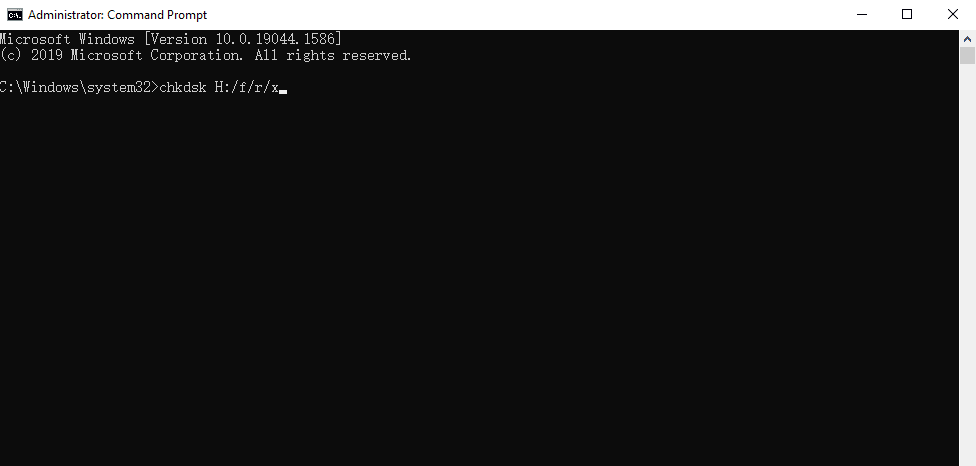
Step 1: Press “Win+X” and select “Command Prompt (admin)”.
Step 2: Next, type chkdsk H:/f/r/x [H is your drive letter here] and press “Enter”. The scan may take some time, especially if there are numerous sectors requiring repair.

Step 3:By utilizing this tool, it will perform a comprehensive check on your drive and address any disk errors, consequently resolving I/O device errors. As a result, you will no longer encounter the error message such as “only part of a readprocessmemory or writeprocessmemory request was completed.”
Option 8: Change the Drive Letter
One simple solution to fix the I/O device error is to change the drive letter of the storage hardware. In case Windows is unable to assign a drive letter to the device, it can result in I/O errors. You can use the built-in tool to assign a new drive letter to your device. Follow these steps:
Step 1: Press “Win+S” and search for “Computer Management”.
Step 2: Click on “Storage” and then select “Disk Management”.


Step 3: Right-click on the drive that is showing the I/O errors. Then, select “Change Drive Letter and Paths” and click “Change”.
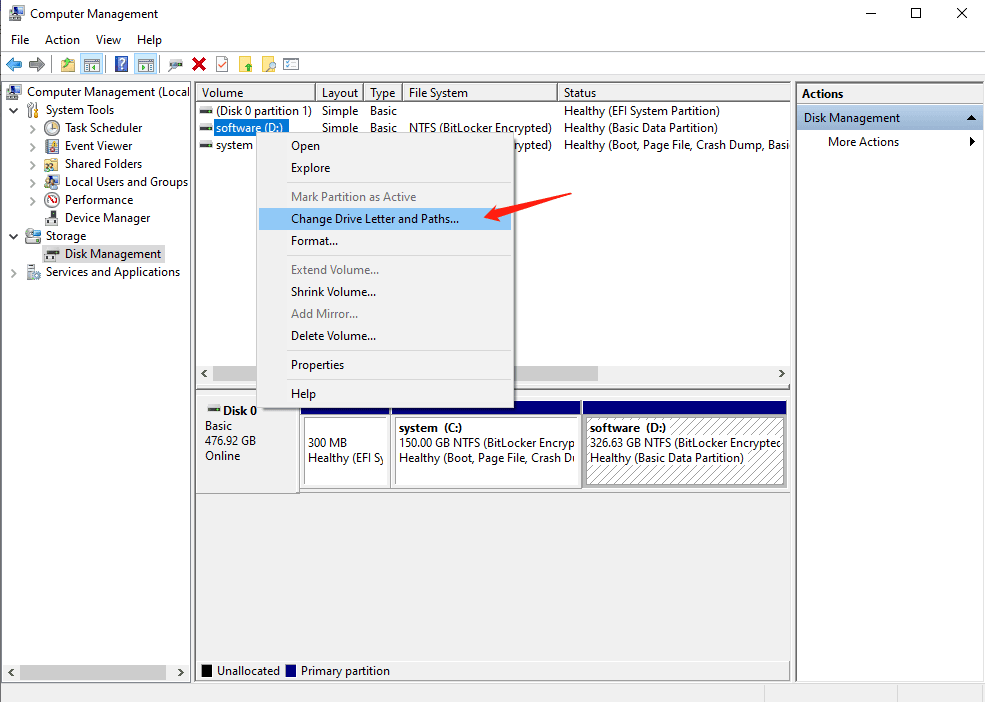

Step 4: Select a new drive letter from the dropdown list, then click “OK”.
Now, restart your computer and try accessing the drive again.
Option 9: Professional Service
If none of the aforementioned strategies prove successful in resolving the I/O device error on your hard drive, it is recommended that you consider sending your device for a manual fix. To do so:
Step 1: Get in touch with the product manufacturer of your device and arrange to send the disk for repair.
Step 2: Take your device to a local repair shop and avail their manual repair services.
Step 3: Explore customized manual device fixes and data recovery services from specialized providers.
Causes and Symptoms of I/O Device Error
Causes:
- Improperly connected or damaged cables
- Outdated or incompatible drivers
- Incorrect transfer mode settings for the device
- Disk corruption or bad sectors
Symptoms:
- Error code like “0x8007045d” or “I/O error 32”
- Error message like”only part of a readprocessmemory or writeprocessmemory request was completed”
- Error message like”the request could not be performed i/o error”
How to Prevent I/O Device Error
- Use high-quality cables and connectors
- Regularly update your device drivers to the latest versions
- Always use the “Safely Remove Hardware” option before disconnecting any external devices
- Regularly scanning for malware and viruses
- Regular disk maintenance tasks, such as disk cleanup and disk error checking
Final words about I/O Errors
In conclusion, understanding and addressing the I/O device error is crucial for ensuring smooth data transfer and device functionality. By following the steps outlined in this article, you can effectively troubleshoot and resolve common I/O errors, including error message “the request could not be performed I/O error.” Take the necessary precautions, keep your drivers updated, and maintain a healthy disk to minimize the occurrence of the I/O device error.