

There are a lot of reasons for you to record your screen on Windows 10, for instance, recording gameplays, video tutorials, webinars, streaming live videos, Zoom meetings and much more. When it comes to screen recording, it is important for you to choose a screen recorder that best suits your needs and possibly with editing features. Here today we are going to review a simple but powerful recorder, namely TuneFab Screen Recorder.
TuneFab Screen Recorder is one of the most popular software in capturing screen activities and with good quality. It not only offers you the basic functions of a screen recorder but also supports a variety of video customizations such as video quality, frame rate and so on. With TuneFab Screen Recorder, you can easily export recorded videos in major formats and share them on social media. It is such a powerful and handy tool to use for screen recording. Key Features are listed below to learn more.
Key Features of TuneFab Screen Recorder
- Various Types of Recording Mode
With TuneFab Screen Recorder, you can enjoy video recording, audio recording, webcam recording with or without audio.
- Offers Different Levels of Quality and Frame Rate
TuneFab Screen Recorder gives you different options for video quality such as lowest, high to lossless. You may also set frame rate ranging from 20 fps to 60 fps.
- Standard Output Formats Available
You can save your videos to any popular formats you set, such as MOV, MP4, M4V, GIF and other formats without any quality loss.
- Allows Real-time Editing
The built-in editing tool allows you to add annotations, draw shapes or highlight areas with color on your the screen while recording without the need for pausing.
- Supports Scheduled Recording
Setting the start time and end time for screen recording is easy in TuneFab Screen Recorder such that you don’t need to worry when you are not available to start the recording.
- Take a Screenshot While Recording
You can take a screenshot easily whenever you want while recording to save your time by presetting hotkeys or clicking screenshot button.
Pros and Cons of TuneFab Screen Recorder
Pros:
- Recorded area is adjustable: You can record entire screen, window or customized area.
- Easy to use: The user interface is friendly and straightforward.
- Basic video editing features are available: annotations, shapes, highlighting, change volume and more.
- Hotkeys are adjustable before recording.
- Free screen capture is available.
- Compatible with Windows and Mac: Windows 10/8.1/8/7 and macOS 10.9 to 10.15.
- Ad-free and no watermarks on video.
Cons:
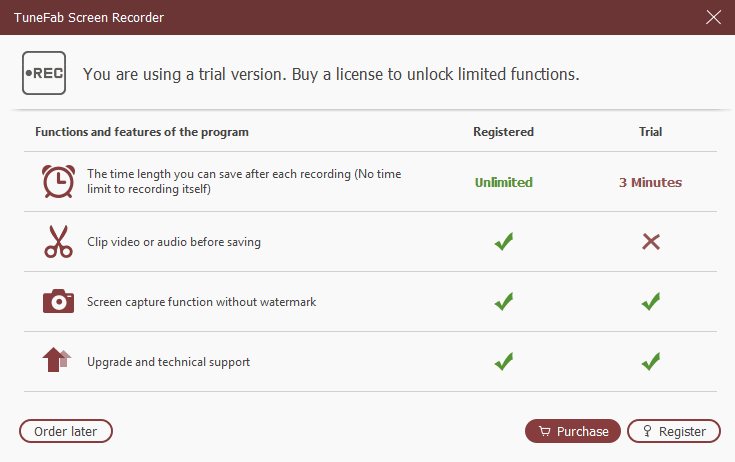
- Free version is allowed to record screen up to 3 minutes length video.
- Trimming videos is not available in free trial version
Is it Worth Buying Full Version of TuneFab Screen Recorder?
The price currently for TuneFab Screen Recorder on Windows/Mac is $24.95 for 1-year subscription, $34.95 for personal (1 PC) lifetime license and $69.95 for family (2-5 PCs) lifetime license. The full version allows you to record and save the unlimited time of videos so that you can gain more from the TuneFab Screen Recorder. Besides, if you want to edit your video after recording, then you definitely want to get the full version such that you can clip your recorded video.
How to record your screen on Windows 10 with TuneFab Screen Recorder?
To record your screen on Windows using TuneFab Screen Recorder:
Step 1. Download and Install TuneFab Screen Recorder
Download TuneFab Screen Recorder via this from the TuneFab website. Follow instructions and install TuneFab Screen Recorder on your PC. Open the software and you will see a registration window popping up. You may purchase the full version or register an account with TuneFab here.

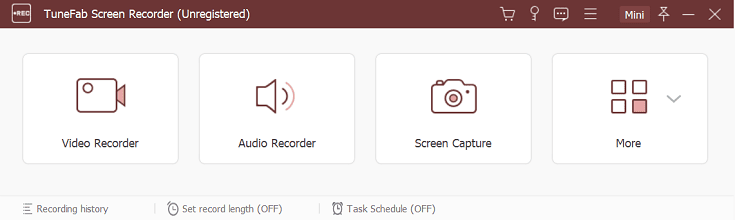
Step 2. Select “Video Recorder” to start
Meanwhile, you will see the main interface of TuneFab Screen Recorder. There are various options available such as “Video Recorder”, “Audio Recorder”, “Screen Capture” and “More”. To record your screen activities, select “Video Recorder”.

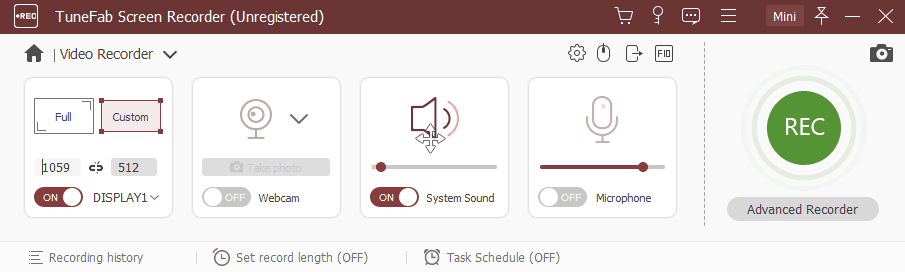
Step 3. Set the Recording Area
Select the area that you want to record. You can record your entire screen by clicking “Full” or part of screen by clicking “Custom” or use system presets as indicated. If you want to record your screen with audio, you can turn on microphone or system sound.

Step 4. Adjust Video Recording Settings
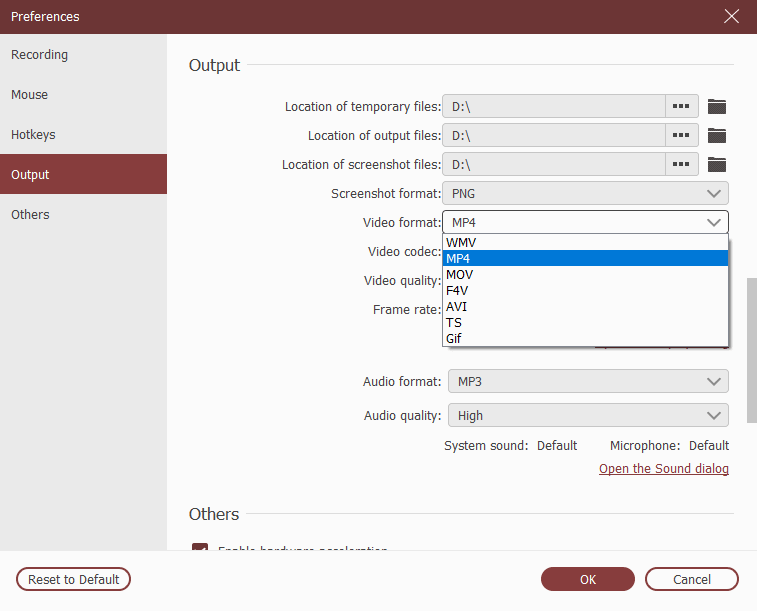
Click the Gear icon at the right to open “Preferences” settings. In the “Output” tab, you can set the output file location, output format, video quality and frame rate. You can save it to MOV, MP4, M4V, Gif and more.

Step 5. Record Screen on Windows 10 by Clicking to REC
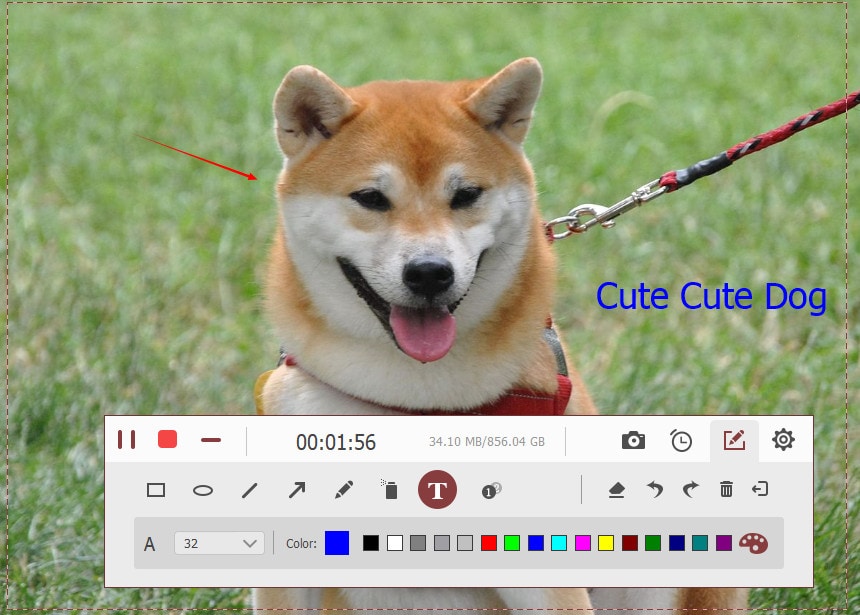
Click the green “REC” button at the right of the interface or use hotkeys to start recording. While recording, you can click on the Pencil icon to open the editing panel. There are various editing options available on the editor, you can add text, draw shapes like arrows and shapes, or highlight areas on your screen without pausing the recording.

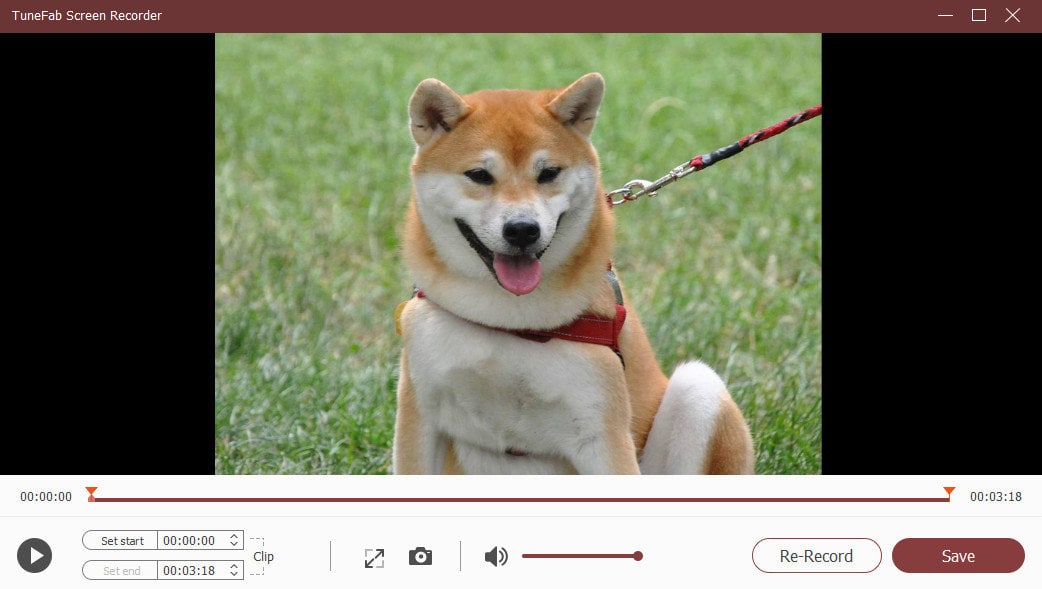
Step 6. Click “Save” to Save Recorded Video
You can click the red square shape button at the top left to end your recording. You can replay the video and see if you have recorded everything you need. When the recorded video is done, click “Save” to save it.

In short, TuneFab Screen Recorder has all the necessary for screen recording and editing. Using TuneFab Screen Recorder, you can access to diverse video recording options and video customization settings. It is such an easy-to-use tool that one would recommend to you. If you think this is helpful, please don’t hesitate to share it with your friends via Facebook, Twitter or other social networks. If you have any questions, please feel free to leave a comment below.