


Do you want to downgrade macOS Sonoma without losing data due to various bugs and glitches in the new beta version? Many Mac users have reported encountering issues like screen freezes or system crashes after updating to macOS Sonoma. However, don’t worry! In this article, we will provide three proven methods on how to successfully downgrade macOS Sonoma to Ventura, ensuring a smoother and more stable Mac experience.
Things before Learning How to Downgrade macOS Sonoma to Ventura
1. Backup all your data
If you want to downgrade macOS Sonoma, it is crucial to back up your data to prevent potential loss. This is because the downgrade process will erase all the data on your system. There are several methods available to assist you in effectively backing up your data. However, it is not recommended to use Apple’s Time Machine for this specific backup, as recovering from a Time Machine backup made in macOS Sonoma will restore the Sonoma system as well.
Instead, you can manually transfer your important files to an external storage, such as an external hard drive or a USB flash drive. Additionally, cloud storage services like iCloud or Google Drive offer convenient options for securely backing up your data online.
Bonus Tip: Downgrade macOS Sonoma Without Losing Data
Sometimes, it’s easy to forget to back up your important data, and even if you do have a backup, there may be situations where you’re unable to restore the data after a downgrade process. In such cases, third-party software like Tenorshare 4DDiG Mac Data Recovery can be incredibly helpful. This software specializes in recovering permanently deleted, lost, corrupted, hidden, and damaged files in just three simple steps. Some notable features of 4DDiG include:
- Recovery of data from internal and external drives, Mac-based devices, USBs, SD cards, and digital cameras.
- Support for recovering over 1000 file formats, including audio, video, document, and photo files.
- Patent recovery technology that enables retrieval of files from Apple Silicon M1, M1 Pro, M1 Max Macs, and T2-encrypted Macs.
- A Higher success rate in data recovery.
- Fast scan speed and user-friendly
Now, let’s go through the three steps to recover lost files:
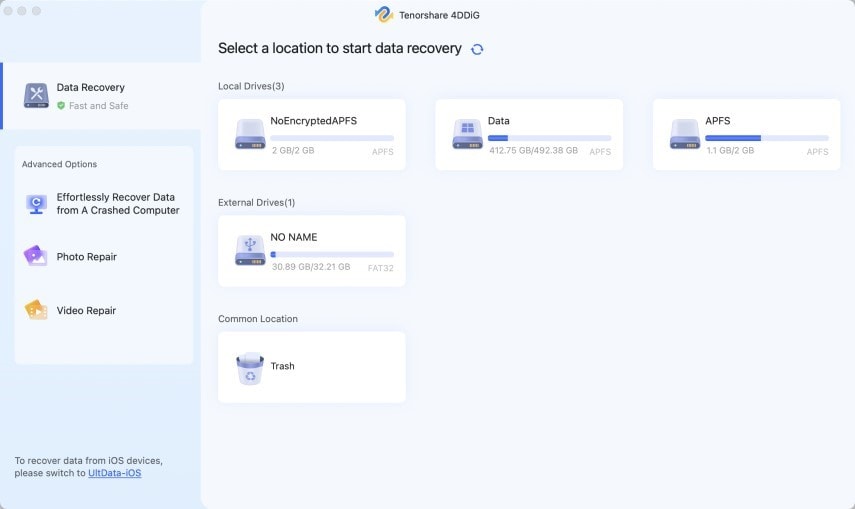
Step 1: Install and launch the software on your Mac. Then, choose a location, such as local drives or the location where your missing files used to be stored, to initiate the recovery process.

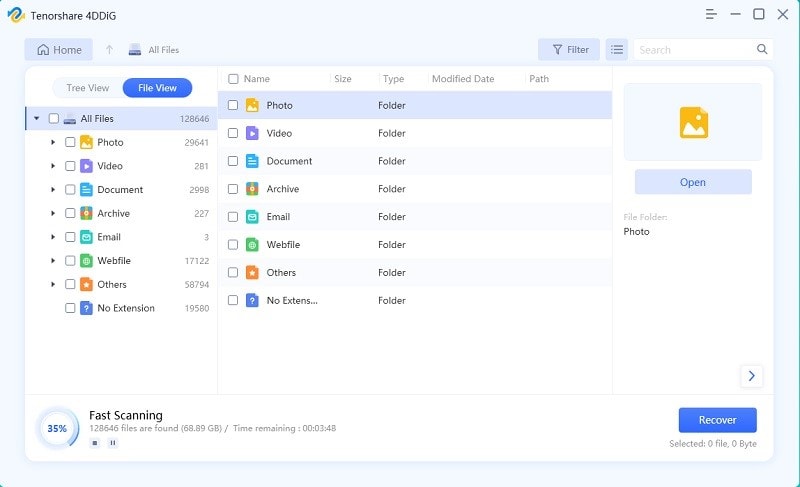
Step 2: Click the “Scan” button to start searching for lost files. The scan may take some time to complete. You can pause or stop the scan at any point to preview the details of your targeted files.

Step 3: Once the scan is finished, click the “Recover” button to save the files in another location. It’s important not to save them in the same partition where you lost them to avoid overwriting the data.


2. Do some basic check
Before initiating the downgrade process, it is important to ensure that macOS Ventura is compatible with your device. This will help avoid any potential compatibility issues that may arise during the downgrade. For example, it is important to determine your processor type as the downgrade steps may vary accordingly.
How to Downgrade macOS Sonoma to Ventura in 3 Ways
1.Boot into Recovery Mode to Downgrade macOS Sonoma
macOS Recovery mode is a special boot mode that allows users to downgrade macOS Sonoma to Ventura. However, it is important to note that this method is not compatible with M1 or M2 Macs, as they restrict the reinstallation of any version other than the one currently installed.
Conversely, for devices that support multiple macOS versions, such as Macs with Intel chips, Recovery mode can be used to restore or reinstall previous versions as long as those versions are still supported and available on Apple servers.
Here is how to use it:
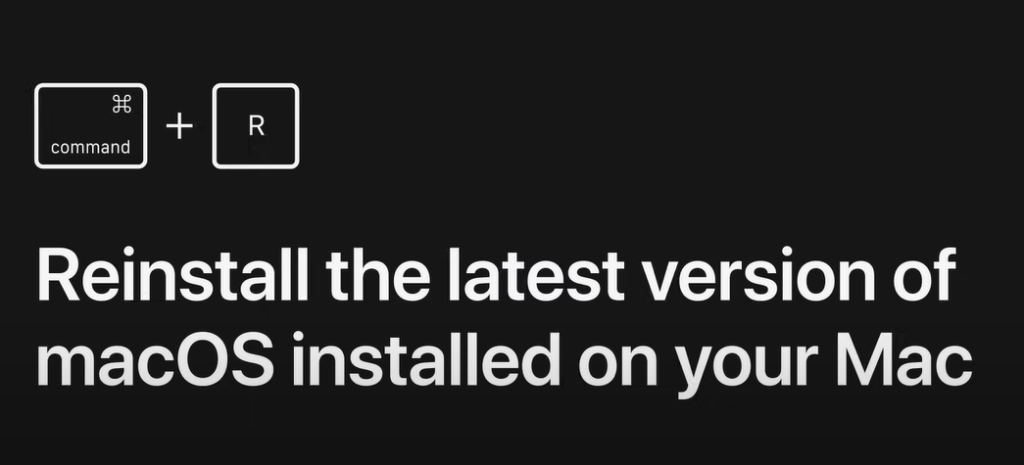
Step 1: Turn on your Mac. Then, quickly press and hold the following key combination: Shift + Option + Command + R.


Step 2: Enter your password when prompted and click on Continue > Next > Reinstall macOS.
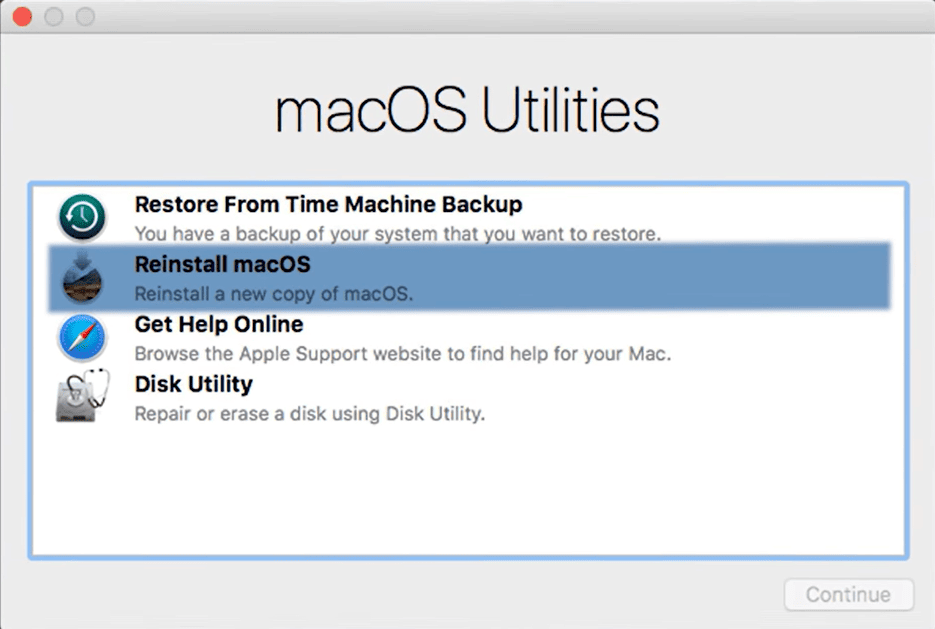

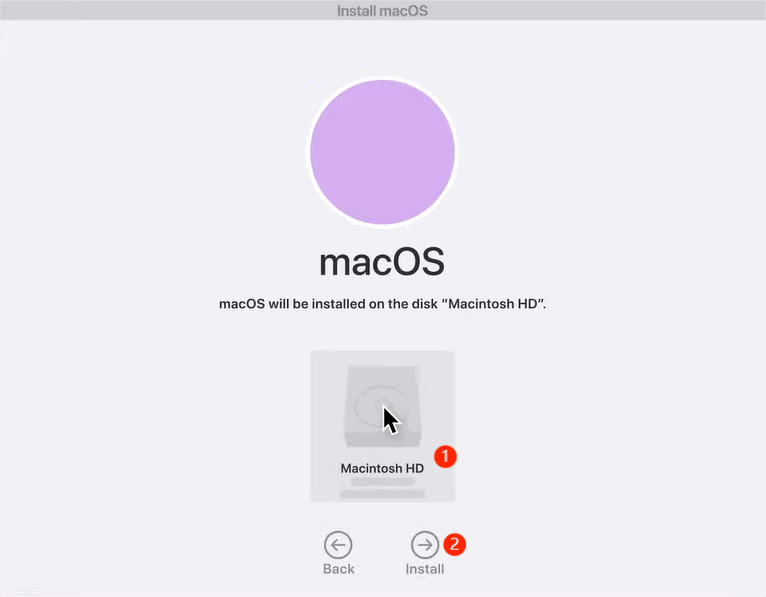
Step 3: Select the disk where you want to install macOS Ventura, and then wait while macOS automatically installs on your Mac.

2. Create a Bootable USB Drive to Downgrade macOS Sonoma
You can also downgrade macOS Sonoma to Ventura using a Bootable Installer. However, there are a few things to consider before preparing a macOS downgrade with a bootable drive.
- You will need a USB drive with at least 20GB of storage space.
- A stable internet connection is required for downloading macOS Ventura.
- If your Mac has a USB-C port and you have a USB 3 pen drive, use a connector to connect the drive to the port.
Here’s a step-by-step guide on how to downgrade macOS Sonoma without losing data using a bootable USB drive:
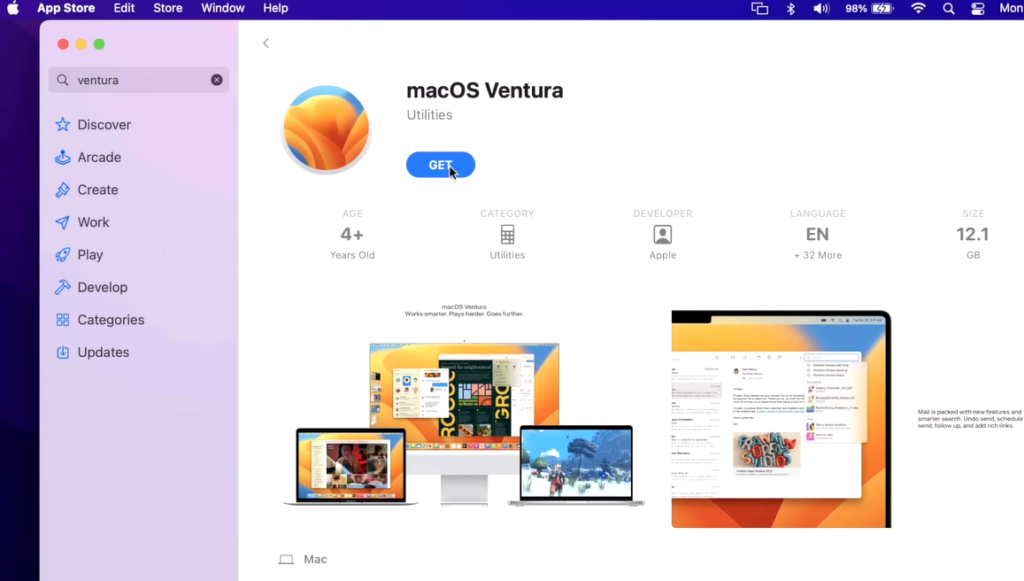
Step 1: Open the Mac App Store and search for the macOS Ventura installer. Then, download it on your Mac.

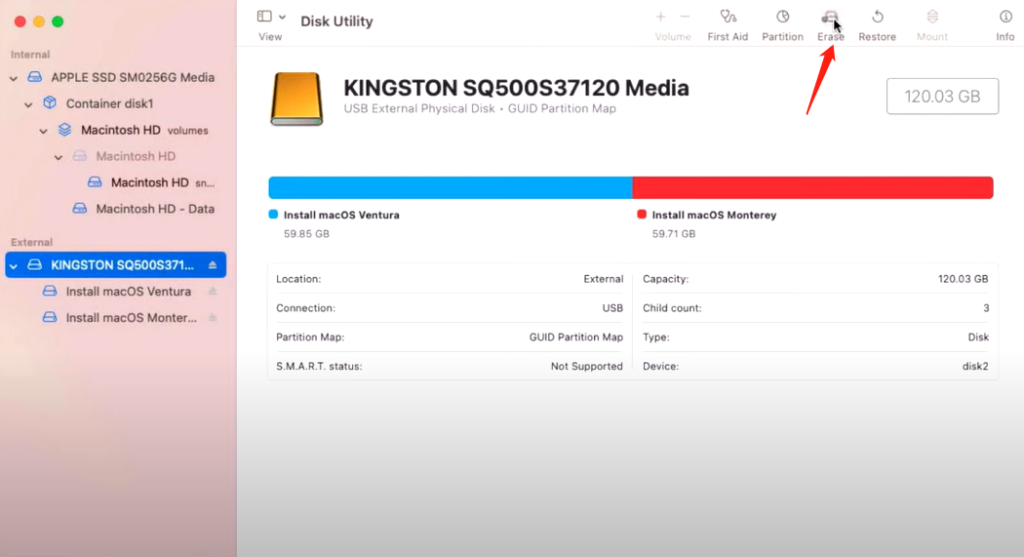
Step 2: Next, you can start by preparing the bootable drive. Simply connect a USB drive to your Mac device and proceed to erase the hard drive.
Step 3: Open Disk Utility and Select the drive on the left side panel under “External” and choose “Erase” from the top menu bar.

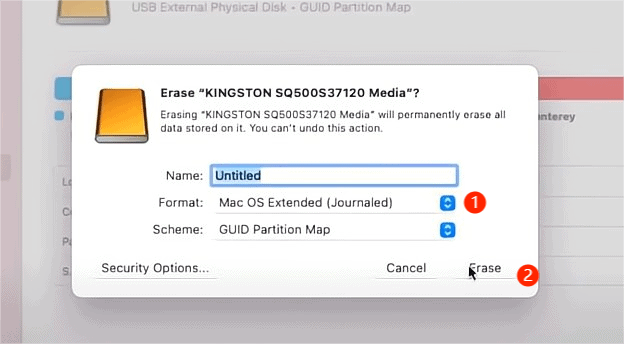
Step 4: In the dialogue box, choose the format “Mac OS Extended (Journaled)” and click the “Erase” button.

Step 5: In Terminal, copy and paste the command “sudo /Applications/Install\ macOS\ Ventura.app/Contents/Resources/createinstallmedia –volume /Volumes/Untitled”
Note: Replace “Untitled” with the name of your USB drive.
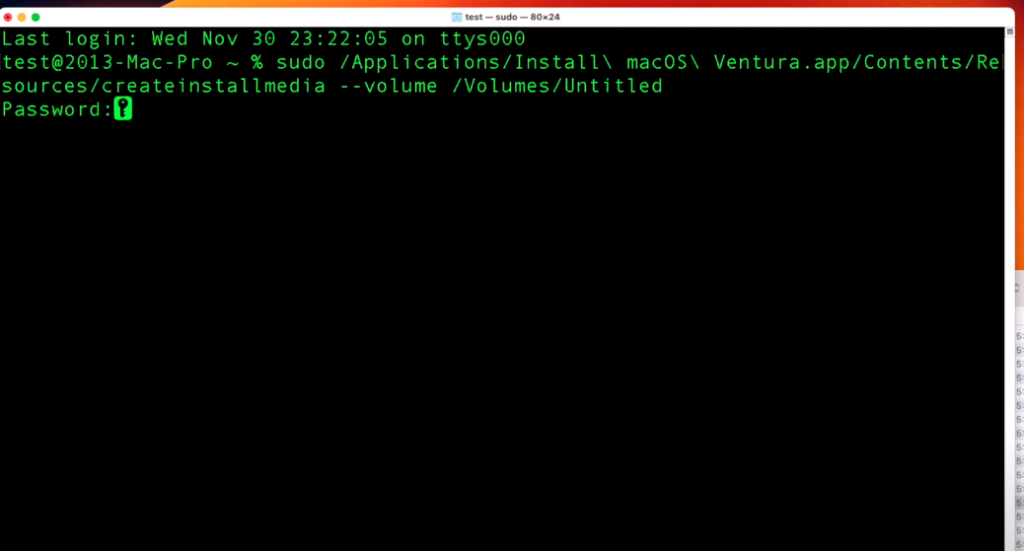

Step 6: Enter your user account password. Then, continue type Y and press Enter to erase the volume.
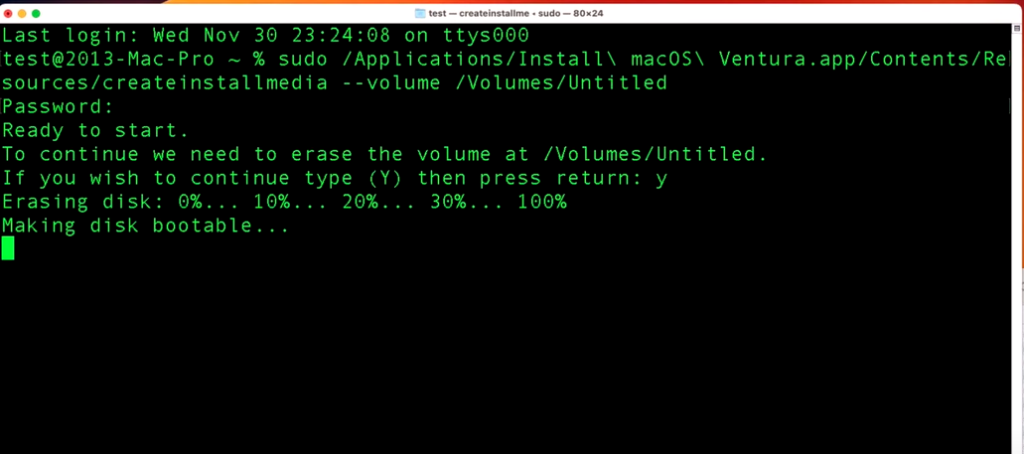

Step 7: Terminal will now copy the macOS Ventura installation files to the USB drive. Once the process is completed, close Terminal. Turn off your Mac and boot it into recovery mode.
Step 8: For Intel-based Mac, press the “Option” key to verify your installer disk. For Apple Silicon-based Mac, press the “Power” button to see the installer disk.
Step 9: Select “Install Ventura OS” and click “Continue.” Choose “macOS Beta” and click “Next” to enter your password.
Step 10: Follow the installation prompts given by your Mac system to install macOS Ventura.
3. Use Time Machine Backup to Downgrade macOS Sonoma
While Time Machine’s primary function is to backup and restore files and data, it can also be used to revert the entire system to a previous state, including the operating system version. If you have an older Time Machine backup from before the upgrade, it can greatly simplify the downgrade process.
Here’s a step-by-step guide on how to downgrade macOS Sonoma to Ventura using Time Machine:
Step 1: Plug your external storage device containing the Time Machine backup into your Mac and restart it.
For Intel Macs, hold down Command + R until the Apple logo appears. For M1 or M2 Macs, press and hold the power button until the Options menu appears.

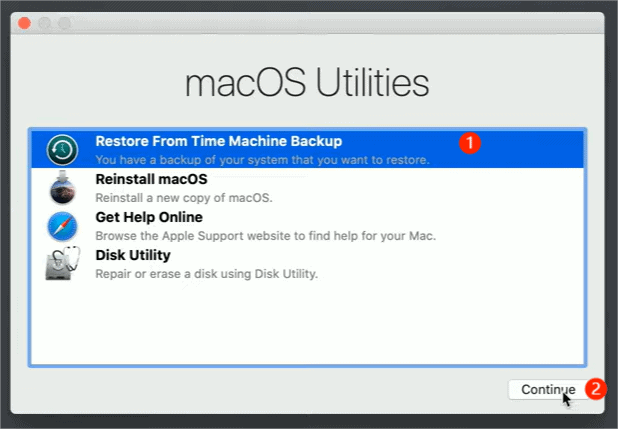
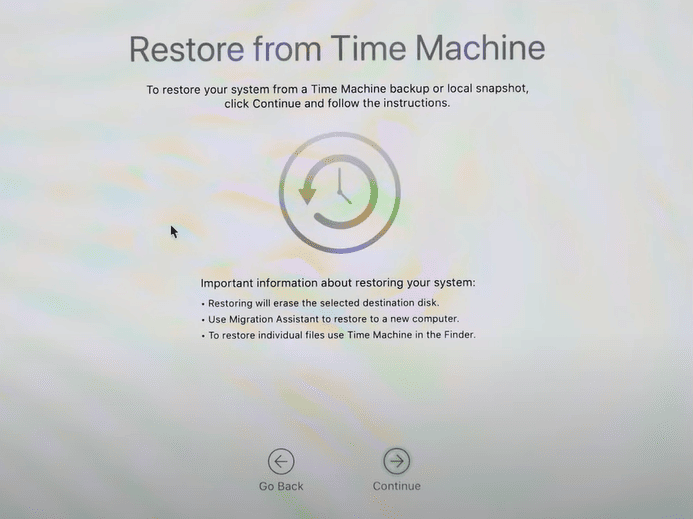
Step 2: Choose “Restore From Time Machine Backup” and click “Continue”.

Step 3: A window will pop up and click “Continue” again.

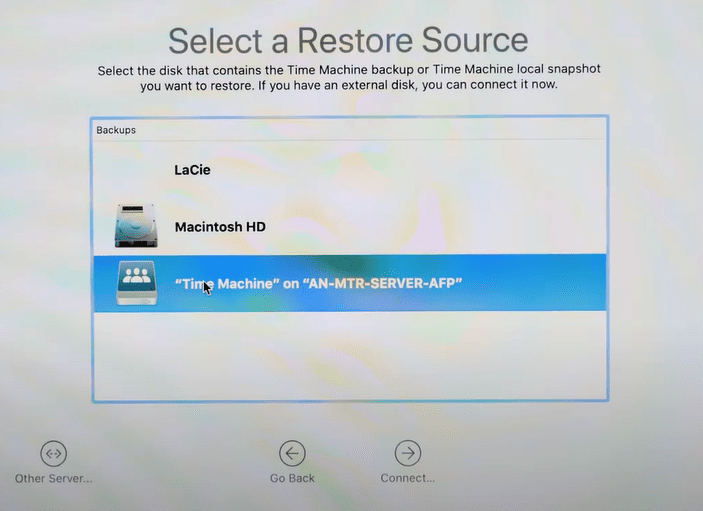
Step 4: Select your Restore Source, which should be your backup drive.

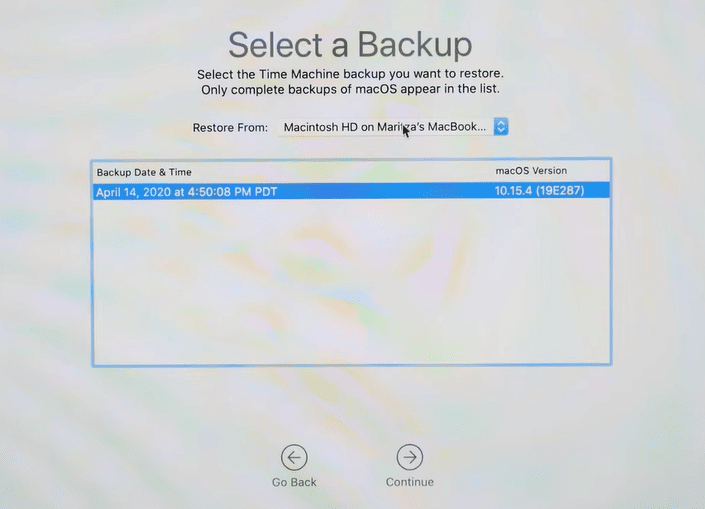
Step 5: This window displays all your backups over time. Choose the most recent backup made before updating to the newer version of macOS (you can see which version of macOS the backup was made in).

Once you have restored the older version of macOS, you can recover the files you created since then from your separate backup.
Precautions When Downgrading your Mac
It’s important to note that a downgrade from macOS Sonoma to Ventura will take a significant amount of time. Therefore, it is essential to perform some precautions.
- Ensure that your Mac is connected to a stable WiFi or Ethernet connection to avoid any disruptions.
- Keep your Mac plugged into a power source throughout the downgrade process to prevent any disturbances.
- Follow the designated steps and carefully adhere to the provided instructions. Skipping or misinterpreting any steps could lead to errors or potential loss of data.
If anything goes wrong during the process, you may not able to downgrade macOS Sonoma to Ventura seamlessly and will have to start over again.
Conclusion
With the three methods mentioned in this article, you can bid farewell to any worries or concerns regarding how to downgrade macOS Sonoma to Ventura without losing any data. Additionally, Whether it’s for a smooth system downgrade or to prevent data loss, regularly backing up your files is a great habit to cultivate.
FAQ about How to Downgrade macOS Sonoma to Ventura Without Losing Data
Q: How to downgrade macOS Sonoma?
A: There are three effective methods to downgrade macOS Sonoma to Ventura.
Fix 1: Boot into macOS Recovery mode
Fix 2:Create a bootable installer
Fix 3:Use Time Machine backup
Q: How do I downgrade from Sonoma without losing data?
A:Firstly, if you have the good habit of regularly backing up your files, it’s a straightforward process to downgrad macOS Sonoma without losing data.
Secondly, if you haven’t backed up your files, 4DDiG Mac Data Recovery can help you recover lost data during the system downgrade process.
Q: Is Sonoma better than Ventura?
A:According to Apple, the Mac experience is now better than ever, offering more ways to personalize with widgets and stunning new screen savers, significant updates to Safari and video conferencing, and an optimized gaming experience.