


This article shows the solution of error 0x80070490. Downloading Windows Updates is very important if you wish to keep your Windows 10 PC running safe and fast. This also applies to any other software application installed. Keep them updated. If the error 0x80070490 reveals when installing a Windows Update, attempt a brand-new local account, run the Update Troubleshooter or go deeper with inspecting the Windows Update Services and deleting the Software Distribution folder.
If things don’t go well with upgrading your operating system, see our Windows Updates hub for numerous troubleshooters and guides. Windows Update is one of the many elements that might have a problem. Take a look at the Windows 10 mistakes hub, which covers everything else.
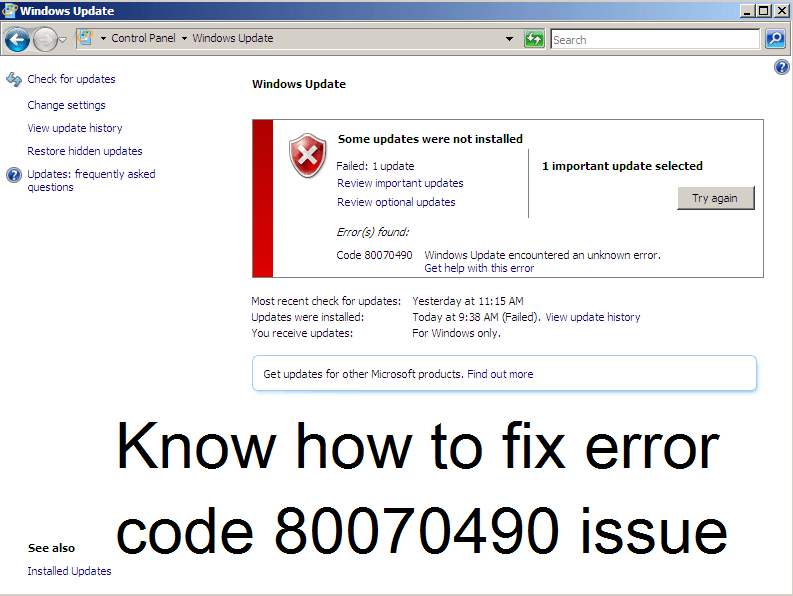
Solved | Windows Update error 0x80070490
In this article, you can find the solution of error 0x80070490 here are the details below;
This software application will fix typical computer mistakes, protect you from file loss, malware, hardware failure, and enhance your PC for maximum efficiency. Fix PC issues and get rid of viruses now in 3 simple steps:
- Download Restore PC Repair Tool rated Great on TrustPilot.com.
- Click Start Scan to discover Windows concerns that could be triggering PC problems.
- Click Repair All to fix problems with Patented Technologies (patent readily available here).
Downloading Windows updates is very important if you wish to keep your Windows 10 PC safe. However, some users have actually reported mistake code 0x80070490 while trying to download Windows updates on Windows 10.
So today, we’re going to learn how to fix error 0x80070490. According to the reports, Windows Update stops running, and when that happens, users get error code 0x80070490.
This can be a big issue due to the fact that you won’t have the ability to download Windows updates, and you’ll be missing out on brand-new functions and security spots.
How can I repair mistake code 0x80070490 on Windows 10?
1. Create a new local account
In order to repair this problem on Windows 10, you’ll need to develop a brand-new local account and move your individual files to it:
- Develop a new local account with administrator privileges.
- Move your files and individual files to a brand-new account.
- Delete your old account and switch to a brand-new one.
- After you’ve switched to a brand-new regional account, add your Microsoft account to it.
After doing that, error 0x80070490 must be repaired. However, if the issue does not get dealt with, attempt some of the solutions listed below.
2. Run the Update Troubleshooter
If you’re running Windows 10, you can utilize the new troubleshooting tool, simply called Windows Troubleshooter. This tool can be utilized for dealing with various system issues, including upgrade issues.
Here’s how to run this troubleshooter in Windows 10:
- Go to Settings
- Head over to Update & Security > Troubleshoot
- Find Windows Update and click Run the troubleshooter
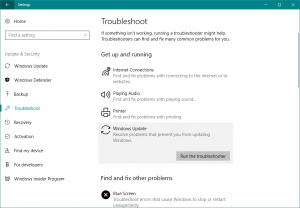

- Follow even more on-screen guidelines
- Reboot your computer system
If the troubleshooter stops prior to completing the procedure, fix it with the help of this total guide.
3. Run the SFC scan
Since we’re at the troubleshooting tools in Windows 10, let’s attempt another one. This time, we’ll be using the SFC scan. In case you’re not acquainted with this tool, it serves as another integrated troubleshooter created for fixing numerous system problems.
However, the SFC scan does not have the interfaces, so you’ll have to run it using the Command Prompt. In case you do not understand how to do that, simply follow these guidelines:
- Go to Search, type cmd, and open Command Prompt as Administrator.
- Enter the following line and press Enter: SFC/scannow
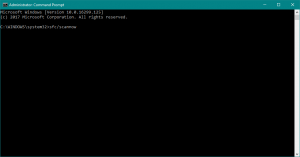

- Wait for the process to complete.
- Reboot your computer.
If you’re having trouble accessing Command Prompt as an admin, then you better take a closer look at this guide.
4. Run DISM
And the last troubleshooting tool we’re going to attempt when fixing the 0x80070490 is the DISM. Implementation Image & Servicing Management (DISM) is yet another fixing tool in Windows 10, but it’s the most effective one.
So, if previous troubleshooters stopped working to resolve the issue, we’re going to attempt this one. In case you do not understand how to run DISM, just follow error 0x80070490 the guidelines below:
- Go to Search, type cmd, and open Command Prompt as Administrator.
- Enter the following command on the command line:
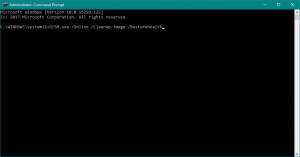

DISM.exe/ Online/ Cleanup-image/ Restorehealth.
- In case the DISM can’t acquire files online, attempt using your setup USB or DVD. Place media and type the following command.
DISM.exe/ Online/ Cleanup-Image/ RestoreHealth/ Source: C: RepairSourceWindows/ LimitAccess.
- Make certain to replace the “C: RepairSourceWindows” path of your DVD or USB.
5. Look for viruses.
Some users likewise associate the error 0x80070490 with infection or some other kind of malware. So, if none of the solutions from above managed to resolve the issue, scan your computer system for infections.
6. Disable antiviruses.
On the contrary to the previous solution, there’s a chance your antivirus is exactly what provides you this mistake. Antivirus programs and Windows updates are understood for not getting along with each other.
Remove PC Errors
Run a PC Scan with Restore Repair Tool to discover error 0x80070490 triggering security problems and downturns. After the scan is complete, the repair work procedure will replace broken files with fresh Windows files and elements.
On top of that, you might likewise consider changing your antiviruses service or changing to Windows Defender, which is a great antivirus service.
For the Norton users, we’ve got a devoted guide on how to remove it from your PC entirely. There’s a comparable guide for McAffee users, as well.
If you’re utilizing any antivirus service and you want to totally remove it from your PC, make sure to have a look at this incredible list with the very best uninstaller software application you can use right now.
7. Delete user ID shop cache from pc registry.
To do that, follow these actions.
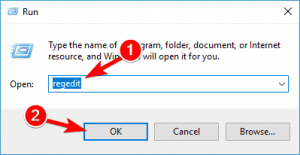
- Open Registry Editor. You can open Registry Editor by pushing Windows Key + R and typing Regedit. After you’ve typed Regedit, press Enter or click OK to begin Registry Editor.

- When Registry Editor starts, you require to browse to the following key in the left panel.
oHKEY_LOCAL_MACHINESOFTWAREMicrosoftWindowsCurrentVersionAppxAppxAllUserStore.
- Now, you need to discover keys that appear like this: S-1-5-21-1505978256-3813739684-4272618129-1016. We have to point out that this is just an example, and most likely, your keys will have a similar format. However, the name of the secrets won’t be exactly the exact same.
- Select all these secrets and erase them.
- After you’ve erased these secrets, close Registry Editor and reboot your computer system.
If you can’t edit your Windows 10’s pc registry, read this convenient guide and find the quickest solutions to the issue.
8. Check if BITS, Cryptographic, MSI Installer, and the Windows Update Services are running.
- Press Windows Key + R and type services.msc.
- When the Services window begins, discover the following services: BITS, Cryptographic, MSI Installer, and the Windows Update Services. Make certain that those services are running.
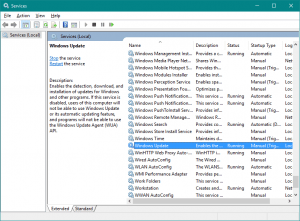

- If one or more of these services aren’t running, make sure that you start them by selecting the service and clicking Start the service.
Many users do not know what to do if their Windows key stops working. Check out this amazing guide and be a step ahead.
9. Erase the Software Distribution folder.
The last thing we’re going to attempt is erasing the SoftwareDistribution folder. This folder stores all upgrade data, so if something inside this folder gets corrupted, you may experience some update issues.
But before we delete this folder, we need to disable the Windows Update service. And here’s how to do that.
- Go to Search, type services.msc, and go to Services.
- In the Services list, look for Windows Update.
3.Right-click and go to Properties, then select Disable.
- Reboot your computer system.
Your Windows search box is missing out on? Get it back by following some simple steps from this devoted guide.
Now that the Windows Update service is handicapped, let’s go and delete (relabel) the SoftwareDistribution folder.
- Navigate to C: Windows and discover the SoftwareDistribution folder.
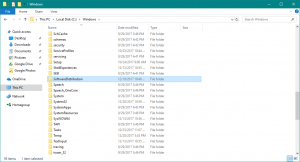

- Relabel folder to SoftwareDistribution.OLD (you can delete it, but it’s safer if we simply leave it there).
- Restart your computer.
Not sure what to do with the Software Distribution folder? You can either reliable it and even delete the folder.
Once you do that, go and re-enable the Windows Update service.
- Once again, navigate to Services and discover Windows Update and, in Properties, modification from Disabled to Manual.
- Restart your computer once again.
- Check for updates.
As you can see, fixing error 0x80070490 isn’t that tough, and we hope that our solutions were helpful to you.
Check over other articles like :