


This post will explain Transfer file between iphone and mac. There are occasions when you need to transfer data or photographs from your iPhone to your MAC, regardless of how you use your phone or computer. To transfer files between an iPhone and a MAC, there are numerous options.
Top 5 Ways To Transfer Files Between iPhone and Mac
In this article, you can know about Transfer file between iphone and mac here are the details below;
You may transfer data much more easily if you are a part of the Apple ecosystem, which is a collection of connected Apple goods. In any case, let’s look at the procedure.
Part 1: 5 Ways to Transfer Files Btween iPhone and Mac
Knowing how to transfer files can be quite useful, whether you need to post a reel you edited on your computer but can only do so through your phone, or you want to backup your photos on the computer to free up space on your phone.
Way 1: Using AirDroid Personal
AirDroid is yet another excellent choice if you’re trying to figure out how to transfer files from a Mac to an iPhone.
This works easily between devices, especially for larger files, and it will function admirably even with devices that are not part of the Apple ecosystem.
How to use AirDroid Personal is provided below.
In addition, you can use AirDroid Web from the browser to quickly transfer files from an iPhone to a Mac without having to install any desktop software. Also check nvidia control panel missing
Main characteristics of AirDroid Personal
The programme is made for lossless, wireless file transfer across devices.
You may remotely manage your files and documents on many devices.
Rapid file transfer between different systems and gadgets
On the same LAN, files can be shared with nearby devices.
It is an all-in-one tool that can be used to transfer files between platforms, control android devices remotely, mirror their screens, and receive and send SMS on a PC.
Step 1. Download and install AirDroid Personal
You must download AirDroid Personal from the App Store to both of your devices.
Once the app has been downloaded & installed, just register an account by providing your information.
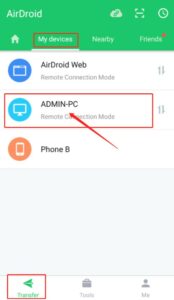
Step 2. Open AirDroid Personal
You’ll see that your device appears on the left sidebar of your screen once you’ve logged into both locations.
In order to select your device, click the File Transfer icon.
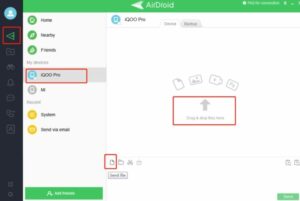

Step 3. Drag and drop
Your files will then be delivered to your iPhone by simply dragging and dropping the file into the area in the middle of the “chat window.”
Similar to this, on your phone, click the Share button next to the file you wish to transmit.
The option to share via AirDroid Personal should appear.
By pressing the AirDroid icon, you may access the software and choose your Mac device from a list of all connected devices.

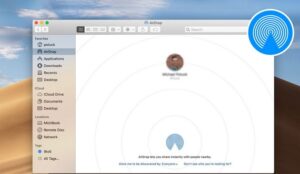
Way 2: Using AirDrop
Your USB cord isn’t always with you.
You may therefore use AirDrop to wirelessly transfer files from a Mac to an iPhone.
Being a piece of the Apple ecosystem has its perks.
These are the minor benefits you receive.
Here’s how to use airdrop to transfer files from an iPhone to a Mac.
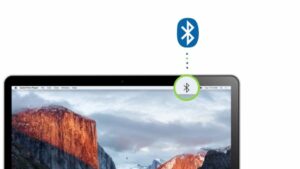
Step 1: Turn on WiFi and Bluetooth on Your Mac
Both of your devices must be turned on, online, and equipped with Bluetooth for AirDrop to function effectively.
Go to Finder on your Mac and select AirDrop from the left sidebar.
If the Bluetooth isn’t already turned on, this should remind you to do so.
Normally, your Mac should be linked to WiFi and have Bluetooth switched on.
You may easily connect your Bluetooth if it isn’t already by clicking the Bluetooth symbol in the top menu bar.

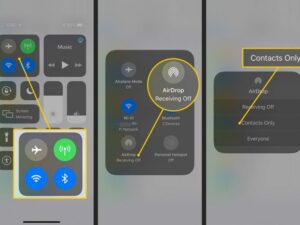
Step 2: Turn on Bluetooth and WiFi on your iPhone
In most cases, your phone should be WiFi-connected.
To access the control centre, simply swipe up from the home screen if necessary.
To enable both WiFi and Bluetooth, click on their respective icons.
Simply hit the AirDrop button when connected and select the option to be found by Everyone.

Step 3: Trasfer the Files
Simply guide to the file you wish to transfer and click on share once your devices are connected.
Press the Share switch in the top right corner of your phone if you’re using one. Also check 0xc1900200
You’ll observe that your Mac appears in the list of choices.
Just click on the name of your Mac, and the files should transfer.
Simply hold down the Control button while clicking the file you wish to transfer on your Mac.
Select Share from the pop-up menu, and then select AirDrop.
A list of devices to which you can AirDrop the file will appear.
You just need to click on the name of your phone to finish.
If AirDrop is already open in your Finder, you can also just drag and drop the item to the recipient device.

Way 3: Using Cable
Simply connecting your phone to your Mac is perhaps the simplest way to transfer data from Mac to iPhone or from iPhone to Mac.
This method is really simple if you have the USB cable with you.
Just adhere to the instructions below.
Step 1. Connect your USB cable
Simply attach your USB cord to your iPhone and your Mac in that order as the first step.
You should now be able to combine the two, and you should notice that both devices begin to immediately recognise one another.
Step 2: Go to Finder
On your Mac, click the Finder icon in the upper left corner of the screen.
This ought to launch a fresh Finder window.
You can scroll down the left sidebar to find your iPhone listed under Devices/Locations.

3. Transfer Files
The only item left to do is determine where you want to send and transfer your files.
Simply remove the file from your Desktop into the folder you want to copy it to if you want to transfer files from a Mac to an iPhone through USB.
And if you want to transfer something from your phone, go to that particular folder and drag the file over to your desktop.
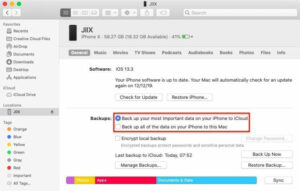
Way 4: Using iTunes
Additionally, iTunes may be used to share MP3 files or music with your phone or Mac, transfer video clips from an iPhone to a Mac, and more.
However, this approach has certain limitations because you can only transfer files that the iTunes software can handle. Also check dev error 6328
Additionally, a USB cable is required to connect your phone in order to do this.
Step 1. Connect your iPhone to Your Mac
Connecting your iPhone to your Mac is the first step.
To do this, use your USB cable.
When your device is linked, a notification ought to appear.
Step 2. Open iTunes on your Mac.
Open the iTunes software on your Mac once you have connected your devices.
You don’t have to launch the app on your phone to share a file while moving files to or from your Mac.
You should see your device in the upper-left corner.


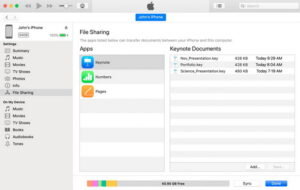
Step 3: Begin File Sharing
You should be able to access your phone by tapping the device symbol.
File Sharing is located on the left sidebar.
You may learn which files on your device you can share in an app by clicking on it.
Some files might not appear in iTunes because it only accepts specific types of files.
To transfer kept files from your Mac to your iPhone, click the Add button below.
Additionally, you can copy files from your iPhone to your Mac by simply selecting the file from the list on the right and selecting Save to.
When prompted to choose a location to save the file, choose one, then press Save to once more to finish.

Way 5: Using iCloud
Syncing or saving your files to iCloud is a fairly simple way to gain access to them on all of your Apple devices.
Your Apple ID can be utilized to sign in to several devices and access those files if you maintain your data synced and backed up.
Additionally, iCloud is an excellent alternative to iTunes since it doesn’t support all file types for transfer.
Here’s how to transfer files from an iPhone to a Mac without iTunes in case your data isn’t synced.
How to use iCloud to transfer files between an iPhone and a Mac
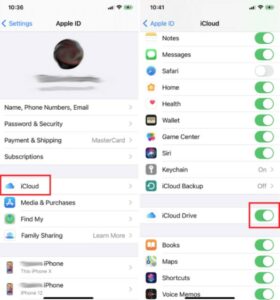
Step 1. Turn on Synch
Switch on Synch, then enter your Apple ID name in the Settings app on your iPhone.
Toggle the iCloud Drive button to green by scrolling down and selecting the iCloud option.
Locate iCloud in System Preferences under the Apple menu on your Mac.
Next, pick iCloud Drive.

Step 2: Transfer the file
If your files are all in sync, you can access the same files on your phone and Mac using the Files app on your iPhone and the iCloud Drive app on your Mac.
Simply connect the Download Now button on the file if you wish to download it for offline use.
Part 2: Is it safe to Transfer Files between Your iPhone and Mac?
To transfer your files is very safe, yes!
Some people continue to believe that connecting your phone to your computer and vice versa can frequently transfer viruses with files.
Even though this may still be true for some devices today, Apple’s operating system makes it incredibly challenging for malware to spread in this manner.
Since each software runs in its own virtual environment, viruses are unable to construct the architecture necessary to infect your device.
Therefore, you can use any of the methods to easily transfer files between your devices.
Your data has extremely little danger of being corrupted, and it is absolutely protected.
Part 3: conclusion
As you can see, each of these approaches is unique, and you might need them in a different situation.
This is why it’s crucial to be aware of several methods for transferring files between an iPhone and a Mac.
You never know which approach might be useful.
FAQs
How to transfer large files between a Mac and an iPhone
The multiple suitable option would be to employ a USB cord to transfer large files, like movies, from your Mac to your phone to view while travelling or for some other purpose.
The USB cable technique is better for handling large files. This is a complete solution to Transfer File Between Iphone and Mac.