


This post will explain Windows 10 System Restore from boot. If you have actually been utilizing the Windows os for a while, you may have sometimes run into problems on your computer from time to time. The majority of these problems, albeit not pertaining straight to system problems, often present the threat of data loss, & in a few events, need you to reinstall the os on your computer.
How To Use System Restore To Fix Windows 10 Problems
In this article, you can know about Windows 10 System Restore from boot here are the details below;
Fortunately, Microsoft has an integrated tool on the Windows operating system (Windows 7, 8, and 10) called System Bring back that offers restore points to help you revert your PC to the previous practical system state and fix most of its problems that might develop due to different system concerns. The following is a guide describing what System Restore is, how it functions, and how to use it to solve your pc problems.

What is System Restore?
System Restore is an integrated tool on Microsoft’s Windows operating system that allows you to restore your computer system to its last practical state such that it is devoid of any existing onboard issues or system malfunctions. Also check DXGI error device hung Apex Legends.
It comes in helpful at times when, say, there is an issue on your computer– system-related or otherwise– that disrupts its normal performance. As in this example, System Restore currently has a bring back point of the last practical state of your system, anywhere it did not have any such concerns, that you can bring back on your computer to repair its issues.
A bring back point, for the young, is generally a snapshot of various system components such as the Windows pc registry, system data, and hardware motorists, which System Bring back takes at regular intervals, or when any of the subsequent triggers take place:
– Software installation (consisting of Windows upgrade).
– Hardware chauffeur updation.
– New driver installation.
However, if you want, you can develop manual restore points of your system too before performing any significant system services on your PC so that you have a restore indicate revert to if anything fails on the system.
What You Require to Understand About System Restore.
Apart from the general concept of its purpose, there are a couple of points about System Restore you require to know to use it effectively.
1. System Restore is accountable for taking a snapshot of all the primary system elements. It is not to be associated with backup, which follows the idea of creating a copy of everything (consisting of individual files) on your drive and saving it such that you can restore it at a later time.
2. If there are any application/programs on your pc that you erase after a bring back point is created, there are very slim possibilities that they will work after you replace your arrangement to that replace point. This is because System Restore can catch a photo of just a few selected data types and programs, & configuration/installer files are not one of the
3. System Restore does not allow you to create an unchangeable bring back point of your system because all restore points are automatically deleted after a given period of time. This time is limited in the Windows Registry files and can be modified. Nevertheless, we do not suggest doing so unless you ensure your actions.
4. To protect the data integrity of your bring back points, System Restore does not enable other application & users on your system to modify or erase files in the directory that stores your restore points.
5. System Restore can in some cases archive malware as part of its bring back points. As a result, it can end up hurting your system (and not repairing your system’s issue in the first place as you planned) and instead require you to erase the restore point and restore your computer to some other bring back point that does not have malware.
How to Practice System Restore on Windows 10.
Utilizing System Bring back involves a few different steps: you need to make it possible for System Restore beginning, after which you can either set it approximately create bring back points instantly or dive in and produce a bring back point manually.
In this guide, we will transcribe down the procedures for Windows 10, but these steps will basically be the same for Windows 8 and Windows 7 also. Also check system restore point Windows 10.
1. Allowing System Restore.
System Restore comes pre enabled for the Order (C:-RRB- drive on the majority of Windows 10 systems. In case, nevertheless, it is not enabled for you, follow the actions listed below to allow it:.
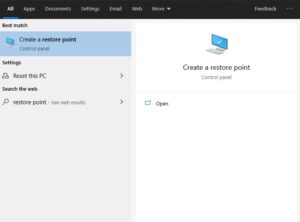
1. Press the Start button & look for “bring back point”.
2. Click on Develop a bring back point from the returned search results page.

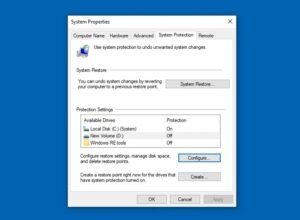
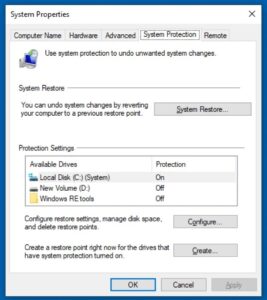
3. In the System Defense tab, following the Protection Settings, select your pc System (C:-RRB- drive & pres Configure.
4. On the next display, pick the Turn on custom security radio button.
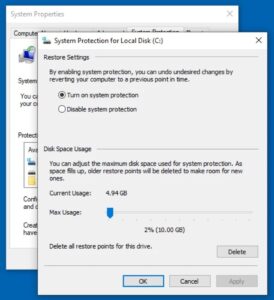

5. Utilize the Max Usage slider to change the optimum disk space you wish to utilize for system protection.
6. Hit Apply to use your changes and click OK to leave System Protection.
Once you make it feasible for System Restore, Windows will immediately create a restore point for the picked drive as soon as weekly or when any of its conditions– ones mentioned earlier are fulfilled.
Do note that given that you have actually chosen the System drive to allow System Bring back in the above steps, it will only secure you when something fails on that particular drive. While this need to secure your system from almost all significant problems, if, for some reason, you want to safeguard other drives too, you can follow the same steps to allow System Restore on those drives.
2. Developing a Restore Point By Hand.
Although System Restore creates bring back points weekly or when any major occasions happen on the system, you also have the choice to create system bring back points manually. This can be beneficial when you want to take the latest photo of your working system before performing any significant operation on it. Also check Apple TV pros and cons 2021.
For example, if you are upgrading the operating system or setting up a program/hardware chauffeur that you think might trigger incompatibility issues or obstruct the performance of other system parts, you can produce a manual restore point before performing such actions.
Follow the steps listed below to manually produce a system restore point on Windows 10:.
1. Head over to the System Characteristics on your pc (follow steps 1-2 above).
2. Go to the System Protection statement in the System Properties dialog box.
3. Click the Create button. Keep in mind that, by default, the system would create a manual bring back point for the drive that has the System Security turned on. So, if it is made it feasible for on multiple drives, choose one, and then click the Create button.
4. Offer a description for your bring back point such that it is simpler to bear in mind at the time of choosing a restore point for restoring your PC.
5. Click Develop.
System Restore will now offer a manual bring back point for your selected drive. It can take anyplace from 30 seconds up to 1 minute for this method to complete. Once it is done, press Close.

3. Restoring Your Practice to a Restore Point.
Now that you have allowed System Bring back on your system and have bring back point( s)– developed automatically or by hand– if your system ever faces problems, you can return it to the modern restore point where it was in a healthy environment.
Following are the measures you require to follow to return your system to a bring back point.
1. Go to the System Residences on your computer system (follow actions 1-2 from Enabling System Restore).
2. Make certain you are on the System Defense tab and click the System Bring back button.
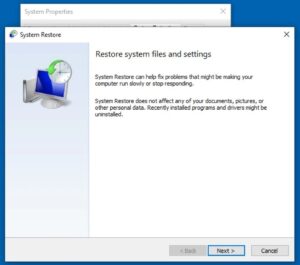
3. On the System Restore dialog receptacle that resembles, click Next.

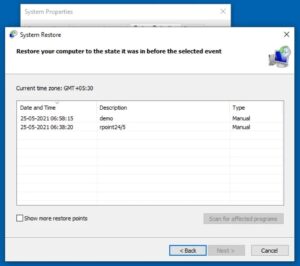
4. Select a bring back name you wish to restore on your PC and hit Next. You also have the choice to identify the programs on your system that will be uninstalled throughout the bring back. To do this, press on the Scan for afflicted programs button.

5. Presuming you opt to recognize afflicted programs, you will see two sections: Programs and drivers that will be erased and Programs and drivers that might be restored. The names for both groups here are pretty obvious: the programs noted under the former will be canceled while those under the latter will be produced back on the system upon reverting to a bring back point.
6. Press Near to go back to the restore point choice page and pick the restore indicate restore on your computer system.
7. Hit Next and confirm your restore point by pushing Complete on the next screen.
8. On the closing dialog box, click Yes.
If you followed all the steps properly as much as this point, Windows ought to now begin the repair procedure on your computer system. Depending on how much information is in your bring back point, the system will take time to go back to it appropriately.
Fixing Windows 10 with System Restore.
With the help of System Restore, you must be able to fix the majority of your system concerns on Windows 10 where the system is unresponsive, malfunctioning, or dealing with other problems that are impeding its overall efficiency. Presuming you have System Restore approved for the System drive on your computer , the entire process of developing restore points need to occur flawlessly, without needing you to produce bring back points by hand at different times.
That stated, though, you should keep in thought about System Restore that the restore points it develops do not assist restore deleted programs or files on your system: they just bring back the system performance by resetting the system parts to their last functional state.
If you are trying to find an option to recover deleted products on your computer system, you need to take a look at Microsoft’s Windows File Recovery or some third-party data recovery software application.