


The brand new and stepped forward Apple iPhone 7, launched in early September, added all the bells and whistles that customers anticipate the modern version to have. With new improvements to the camera, onboard storage area, users were maximum excited about the promised extended battery life. But as with most new era, customers have gotten a feel for the iPhone 7’s strengths and weaknesses, one important weak point being the battery life.
Thankfully for the iPhone 7’s earliest adopters, iPhone 7 battery replacement – theiphonepartsguy.com is a totally possible option for enhancing the battery lifestyles of your new gadget or helping restoration a defective or lifeless battery that just no longer appears to maintain a fee.
About iPhone 7 Battery Life
Apple promises that the iPhone 7 has up to two hours longer battery existence than the iPhone 6S. This includes up to 14 hours of 3G speak time, 10 days of standby, 12 hours of net use on both 3G and LTE, 14 hours of internet use on Wi-Fi,13 hours of video playback or 40 hours of audio playback.
With all these guarantees, customers count on a powerful phone that may offer them all of the charge they wanted for a full day of phone usage. But it looks like those promises of stepped forward battery life have had mixed evaluations which a few reviews which some reports saying it has the best battery life for a cell phone available on the market and some saying it has the worst.
Of route, the usual quick fixes for extending battery life can provide a few clean solutions for users finding their phone’s battery dying.
Quick Fixes to Help with iPhone 7 Battery Life
Users experiencing what looks as if a shorter battery life can strive the following to remedy it:
- Checking for apps which are the usage of a whole lot of the strength supply by means of going to Settings > Battery > Battery usage and scrolling thru the app list to discover the ability battery draining culprit.
- Turning down your display brightness;
- Setting auto-Lock to 1 minute;
- The use of headphones in preference to the speaker;
- Taking advantage of low-strength mode whilst you need it;
Hiding the Clock app in a folder (that little animation can drain some power you may be lacking).
If none of these solutions appear to be helping along with your battery life, there is always the choice of changing the battery.
iPhone 7 Battery Replacement Costs
Replacing a phone battery may be a demanding and frustrating experience, however we’re here to help and show you all of the options you have.
Official Apple Store
If your tool remains below its constrained guarantee or you obtain AppleCare+, your battery alternative won’t value you something; however, take into account that your iPhone 7 is best eligible for battery substitute if it retains much less than 80% of its authentic rate potential. not sure in case you’re blanketed? just pass the AppleCare+ web page on Apple.com and enter the serial range of your iPhone 7.
How to Replace an iPhone 7 Battery: DIY Guide
In case you need to go the DIY direction and try iPhone 7 battery replacement yourself, we have this accessible step-via-step guide to help. As a word: remember the fact that that is a fairly tough system and could take anywhere from 30 minutes to over two hours relying for your experience level.
- Fully turn off the iPhone 7
- Locate the two 3.4 mm pentalobe screws that are located in the iPhone along the edges.
- Softening the adhesive with a hairdryer or a heat gun which will allow you to remove the display.
- Some guides recommend using a device called the iOpener to make this process easier.
- On the display’s bottom a little bit above the home button, put a place a suction cup.
- Create a little gap between the case and display by gently pulling up on the cup.
- Put the flat edge of a probe into the gap you created.
- The adhesive that holds the display is incredibly strong, so if you have some issues creating the gap, gently move the screen down and up to loosen the adhesive.
- Slide the probe up from the lower left edge of the iPhone and gently twist to increase the gap between the case and display.
- Next, slowly slide the probe along the iPhone’s left side moving from the lower left corner and moving towards the silent switch and volume buttons.
- Take out the probe and place the edge into the phone’s bottom right edge.
- Twist the probe to increase the gap you created in-between the case and display.
- Slide the probe up and to the iPhone’s right side to remove the adhesive that holds the display.
- Pull on the suction cup that you placed on the display in an upward direction in order to take off the display and open the device
- Keep in mind to not open the screen more than 10 degrees since there are cables running up the right edge that connect the logic borad to the display.
- Take the suction cup off the display.
- Slide a pick, opening picks work well, around the edge of the top of the device, in between the front panel and case, which will break up any leftover adhesive.
- Carefully pull away the top edge of the display to disconnect the clips that hold the case together.
- Open the left side of the device display and keep in mind that you should not completely separate the display.
- From the lower connector, take out the three 1.2mm tri-point screws and one 2.4mm screws. Note: You will need a special bit in order to properly remove the tri-point screws.
- Use the probe to raise the connector of the battery from its logic board socket.
- Use the probe’s edge to disengage both lower display connectors by moving them up and away from the logic board sockets.
- Take out the two 1.3 mm Phillips screws that secure the bracket over the sensor of the front panel and then take out the bracket.
- Disengage the this from the logic board socket.
- Take off the display and both 1.9 mm Phillips screws that secure the barometric vent.
- Take out the vent.
- Use a probe’s flat edge to remove the Taptic Engine connector.
- Take out the three 1.6 mm Phillips screws that secure the Taptic Engine.
- Take out the Taptic Engine.
- Use tweezers to remove the two strips of adhesive on the bottom of the iPhone battery.
- Make sure that you are keeping the strips flat to prevent any breakage or wrinkling.
- Carefully pull the first battery adhesive tab away towards the bottom of the device.
- Pull carefully and ensure you keep consistent tension until the adhesive strip pulls out from under the battery.
- Repeat this process on the other strip and gently secure the battery in place with a finger to make sure it stays in place.
- If the strips broke before you removed them, you will have to gently pull the battery away from the case using a probe.
- Soften the adhesive with a hairdryer or heat gun and gently pry out the battery out from the bottom left side with a thin plastic card.
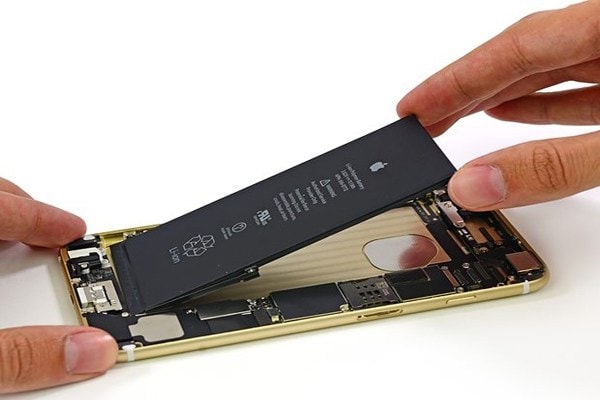
- Remove the battery.
- To reassemble, follow these directions in reverse order.